
Hello ladies!
I hope you all had a great weekend! Mine sure was nice and relaxing.
I have thought long about this post and I finally decided to do it for you all nail art/polish enthusiasts.
Below is a list of all tools and supplies that I use:


I hope you all had a great weekend! Mine sure was nice and relaxing.
I have thought long about this post and I finally decided to do it for you all nail art/polish enthusiasts.
Below is a list of all tools and supplies that I use:
- Cotton pads for polish removal
- Nail Polish remover Oil based (because others are a suffering for my cuticles)
- 1 180/180 nail file for rough filing, 2 softer nail files for detailed forming, 1 buffing and polishing nail file
- Cuticle pusher
- Cuticle scissors
- Baby shampoo and 2 cups of warm water
- AVON glycerin hand cream
- CND Solar cuticle oil
Now on to the pictorial itself.
First stage is: Old nail polish removal


Second stage is: Filing
I personally prefer to file my nails before I soak them, while they are hard, because I have more control over the shape that way. One of the main reasons is that my nails are very soft in nature so its easier to work with them when they are not even softer.
- For the rough part I use the widest black file which is very rough 180/180. I give the basic shape of the nail with it. I use this one only when the nails are very long and if I want to change their shape completely.
- Finishing touches to the shape are added using a Sephora nail files duo in which the black file is a bit rougher than the white. I use the white to carefully do the sides of the nail, which is next to the skin, in order not to irritate the skin there.
- In the end I use my buffing file to remove any flyaway leftovers under the nails and to polish them on top if there are any bumps.

Third stage is: Soaking
In warm water I pour a small amount of baby shampoo and soak my nails for at least 10 minutes to make the cuticles softer and easier to work with in the next stage.

Fourth stage is: Cuticle treatment
- First I use the blunt part of my pusher (which is a relic by the way, belongs to my mom and its 20+ years old and still kickin') to push all cuticles away.
- Then I use the sharp part of the pusher to lift up the cuticles and make sure there's no cuticle left on the nail itself.
- In the end I use the razor to cut all excess cuticles. I do this very carefully and I try to do a whole cuticle at one time, not separately, because it leaves small dots of skin which do not look good in the end. I know many will disagree with the cutting of the cuticles, but I've started doing this since I was 17yrs old and there's no stopping now, as they are very dry and sometimes they irritate me so much.. I don't even want to describe what I do in such times :):)

Fifth stage is: Hand/Nail treatment
- After I'm finished I apply a generous amount of hand cream. Right now I'm using AVON glycerin cream, which was on a sale and its huge, I've been using it for approx 5 months now.
- In the end I apply the bliss for my cuticles - CND "Solar Oil" cuticle treatment. I love this bijou! Its tiny and its miraculous! I bought it 3 months ago and I use it at least once a day and you can see its still halfway there. However I think to get myself SpaRitual Cuti-cle treatment with the pen&pusher, because I think a pen is much, much more easy to use. When I apply the oil I let it soak for a minute or two and then I rub it in.
Important note - Wait at least 30 minutes after you're finished before applying nail polish as the oily treatments on your nail plate will make it bubbly and it will chip off much easier.

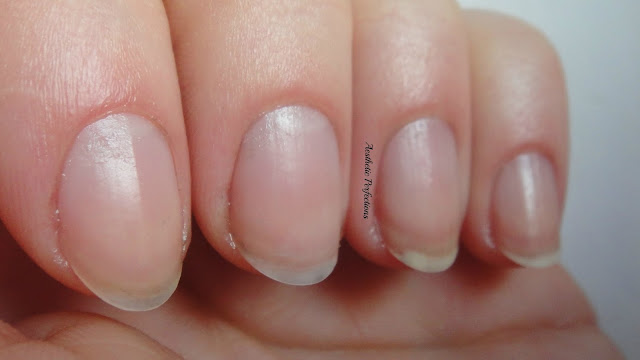
The end result -

I hope this tutorial was useful for you. Thanks for reading it! Let me know your thoughts in the comments :)
No comments:
Post a Comment